
Use the official Bridger Western map to identify your current hub, choose the service you need, and plan around your alignment's available spawn points. Main Town has the Gun Store and a Horse Stable, Outlaw Camp has another stable and its dealer, and the Mud Witch is in the Swamp. Changing your spawn costs 150 Moola, and Inlaws and Outlaws cannot select each other's spawn locations.
This guide follows the official map and location cards reviewed on October 15, 2026. The map image below is official Trello material labeled Labeled Map 4 (8/25/26), with locations presented as approximate. The directory and route suggestions are based on that documentation rather than a live navigation test.
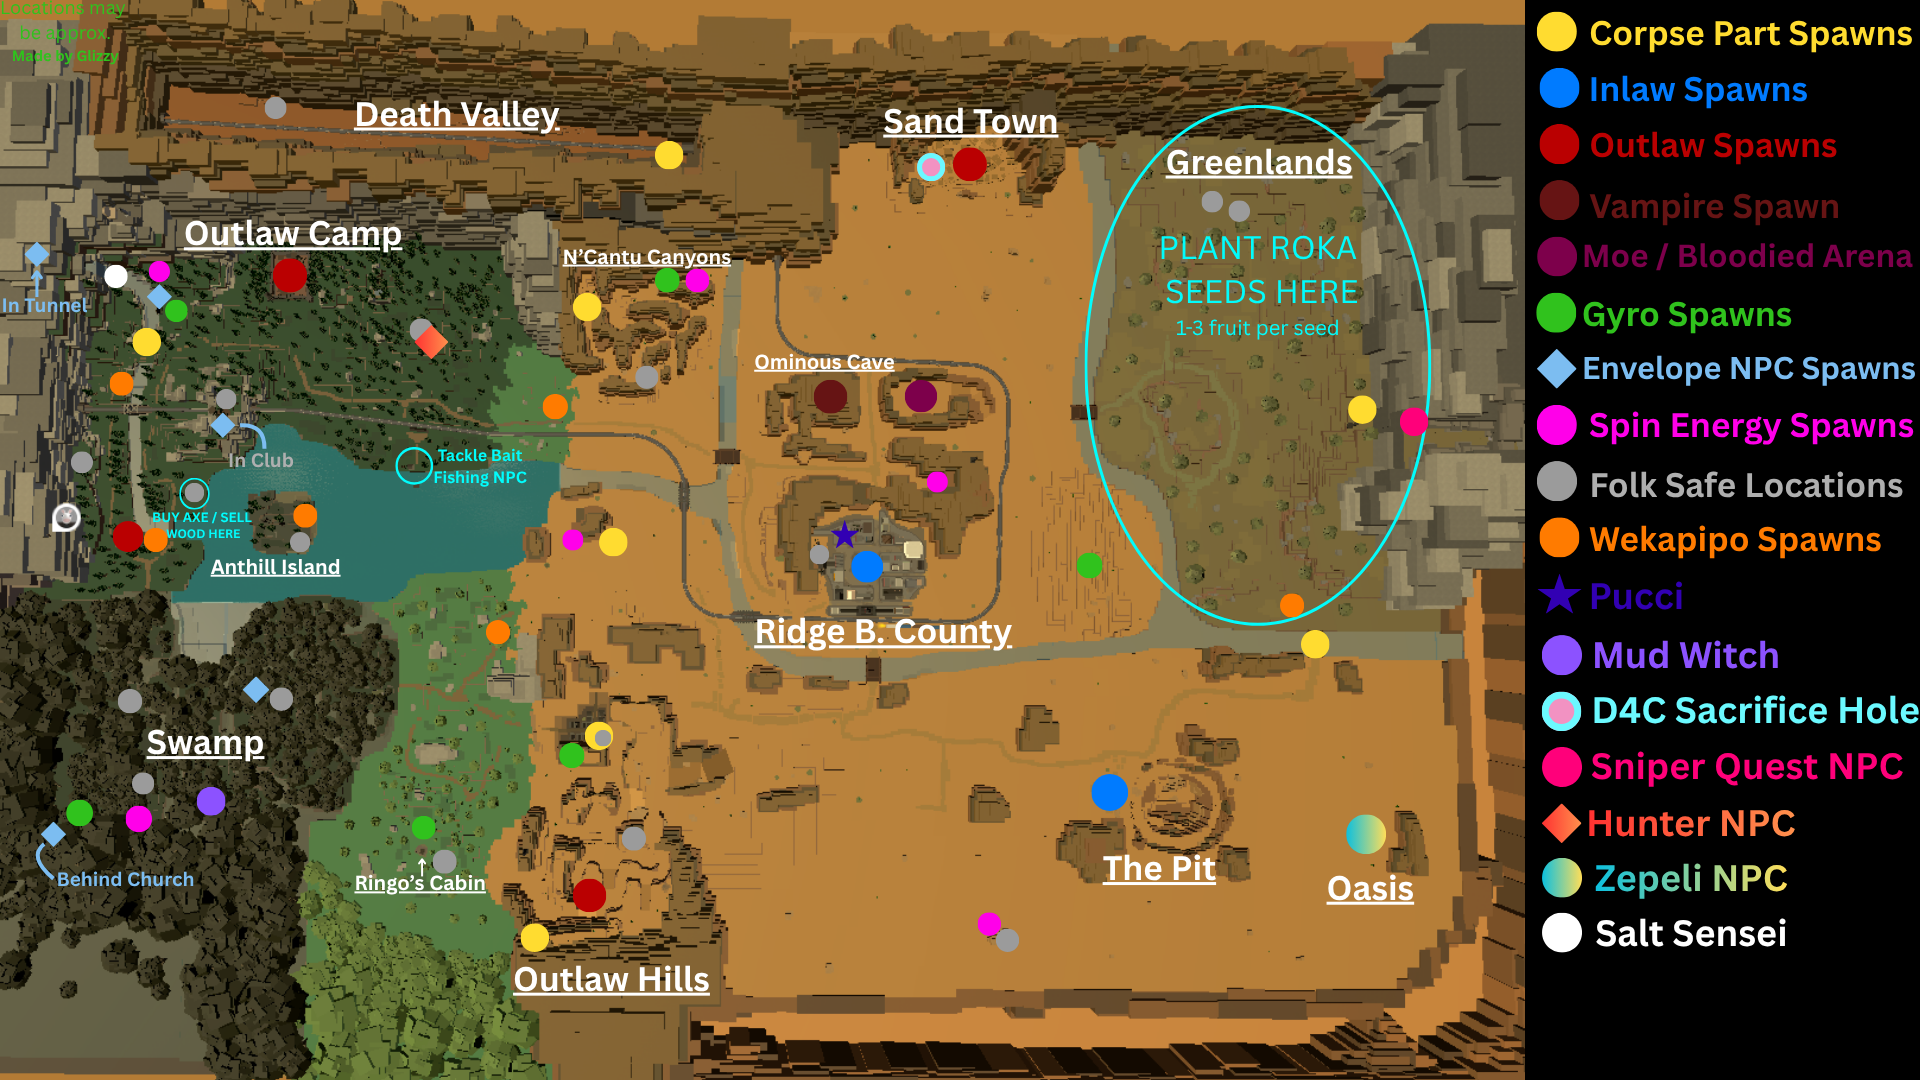
Official Trello map, labeled August 25, 2026. Locations may be approximate; use landmarks and the current game environment to confirm your destination.
01
Locate your spawn before choosing a destination
Start by identifying the named area around your character. The Spawn Locations card separates the map into Inlaw and Outlaw spawn options. Your alignment affects which points you can select, so a nearby marker does not automatically mean it is an eligible home point.
For an Inlaw, the card lists Ridge B. County and Digsite. Ridge B. County places you in one of three buildings, while Digsite uses the adjacent digsite caravan. Use the area name first, then compare the local buildings or caravan with the card's reference images.
For an Outlaw, the listed choices are Campsite, Outlaw Hideout, Outlaw Hills, Red Corner, and Sandtown. Those points spread your options across several named areas. Decide where you expect to spend time before paying to move your spawn, because a point useful for one route may add travel to another.
02
Use the spawn directory to check alignment
The card provides short descriptions that help distinguish similar-looking destinations. Campsite places Outlaws just outside the swamp, while Outlaw Hideout uses a woods fortress. Outlaw Hills selects one of two campfires, Red Corner uses the tunnel, and Sandtown places you in a random building there.
| Alignment | Documented spawn point | Local description |
|---|---|---|
| Inlaw | Ridge B. County | One of three buildings |
| Inlaw | Digsite | Adjacent digsite caravan |
| Outlaw | Campsite | Just outside the swamp |
| Outlaw | Outlaw Hideout | Woods fortress |
| Outlaw | Outlaw Hills | One of two campfires |
| Outlaw | Red Corner | Red Corner tunnel |
| Outlaw | Sandtown | A random building |
Find the location's corresponding NPC when you want to change your spawn. The documented fee is 150 Moola, with alignment restrictions applying even if you can afford it. The source does not identify one universal best spawn, so choose around the activities you are planning next.
03
Understand why your spawn may change after a death
The spawn card says dying at your spawn point has a 30% chance to change it. That rule is described as a way to discourage spawn killing and immediate returns. A changed destination after such a death therefore has a documented explanation beyond choosing the wrong NPC.
Confirm the current location after respawning before restarting a familiar route. If you are farther from the shop than expected, use the area name and map rather than assuming your previous starting point still applies. This small check helps avoid navigating from a landmark that is no longer nearby.
Changing a spawn and buying transport solve different travel problems. A new spawn changes where you return under the game's rules, while a horse helps you move between destinations. The horses guide explains the starter mule and purchase process if repeated trips are your immediate concern.
04
Group Main Town shopping into one trip
The Gun Store card places the shop in the main town and directs you to Chia for purchases. Its stock includes guns, a Sabre, a Bow, and the Coin Gun. Read the weapons guide before traveling solely for an item you may not yet be able to equip.
The Horse Stables card also shows a Main Town stable. A useful town visit can therefore cover both your weapon shopping and a horse offer. This is a suggested way to group errands, not a claim about a measured shortest route between buildings.
The Banker stores guns, utilities, and other items, with a maximum of 15 deposited items. Use storage planning when your shopping would exceed the carrying limit of two guns or four utilities. The bank card says deposits are not preserved upon a character wipe, so check that consequence before treating storage as permanent protection.
05
Check Outlaw Camp for its own services
Outlaw Camp has a second Horse Stable according to the same official stable card. It gives you another place to replace your current mount without treating Main Town as the only documented stable location. Choose the location that fits your current journey and alignment-based starting area.
The Outlaw Camp Dealer card lists guns, throwables, and a Steel Wireset. Its gun stock differs from Chia's, including the Colt Ocelot, Huot Automatic, and Double Barrel Shotgun. Check the exact vendor list before making a trip for one particular weapon.
Do not equate the label Outlaw Camp with every Outlaw spawn name in the directory. Campsite, Outlaw Hideout, and Outlaw Hills have their own descriptions. Match the map label and the destination's reference card so that a similarly named area does not become your assumed landmark.
06
Find the Mud Witch when you have a specific choice
The Mud Witches Hut card places her in the Swamp. She reads fortunes to obtain Cards and also accepts a Dogbane Herb for a separate set of choices. Decide which interaction you need before making the journey, because these are different progression actions.
Her Dogbane options include wiping an existing Stand, decreasing age by 20 years, receiving 2,500 Moola, and wiping a specialty. The specialty option also resets experience, tier, and mastery. Read the Cards guide or Spin guide for the relevant decision before confirming a reset.
The Map card notes that the Vampire Insider shares Wekapipo's spawns. That is useful when comparing their map labels, but it does not establish that either NPC remains at one guaranteed coordinate. Consult the vampire guide for the purpose of that trip.
07
Plan a work route around one activity
The Lumberjack card describes his location as behind Anthill Island, to the left of the Red Corner tunnel. He sells the Axe and buys wood from logging. Use those named landmarks with the map instead of an invented coordinate or travel-time estimate.
For fishing, follow the fishing guide to plan your Tackle Bait purchase and selling loop. For a broader income goal, use the money guide to choose an activity before choosing a destination. This keeps your map search tied to a vendor or task you actually need.
Before leaving a hub, identify the destination, the service there, and the purchase or interaction you intend to make. Check your current spawn and call your mount if you need it. The official Trello and Discord guide provides the source links when a landmark or service changes with later documentation.